| Line 1: | Line 1: | ||
| + | == Incentive == | ||
| + | |||
Using [[Nuaj]] and [[Cirrus]] to create test projects is alright, but came a time where I needed to start what I was put on this Earth to do : deferred HDR rendering. | Using [[Nuaj]] and [[Cirrus]] to create test projects is alright, but came a time where I needed to start what I was put on this Earth to do : deferred HDR rendering. | ||
So naturally I started writing a deferred rendering pipeline which is quite advanced already. At some point, I needed a sky model so, naturally again, I turned to HDR rendering to visualize the result. | So naturally I started writing a deferred rendering pipeline which is quite advanced already. At some point, I needed a sky model so, naturally again, I turned to HDR rendering to visualize the result. | ||
| Line 7: | Line 9: | ||
But to properly test your tone mapping, you need a well balanced lighting for your test scene, that means no hyper dark patches in the middle of a hyper bright scene, as is usually the case when you implement directional lighting by the Sun and... no ambient ! | But to properly test your tone mapping, you need a well balanced lighting for your test scene, that means no hyper dark patches in the middle of a hyper bright scene, as is usually the case when you implement directional lighting by the Sun and... no ambient ! | ||
| + | |||
| + | |||
| + | == Let's put some ambience == | ||
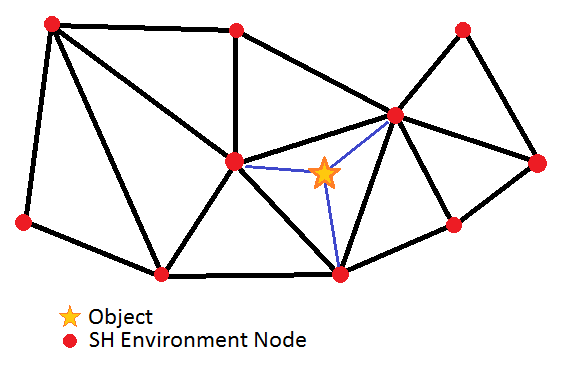
That's when I decided to re-use my old "ambient SH" trick I wrote a few years ago. The idea was to pre-compute some SH for the environment at different places in the game map, and to evaluate the irradiance for each object depending on its position in the network, as shown in the figure below. | That's when I decided to re-use my old "ambient SH" trick I wrote a few years ago. The idea was to pre-compute some SH for the environment at different places in the game map, and to evaluate the irradiance for each object depending on its position in the network, as shown in the figure below. | ||
| Line 19: | Line 24: | ||
Render( Object, ObjectSH ); | Render( Object, ObjectSH ); | ||
} | } | ||
| + | |||
| + | And the rendering was something like (in shader-like language) : | ||
| + | float3 ObjectSH[9]; // These are the ObjectSH from the previous CPU algorithm and change for every object | ||
| + | |||
| + | float3 PixelShader() : COLOR | ||
| + | { | ||
| + | float3 SurfaceNormal = RetrieveSurfaceNormal(); // From normal maps and stuff... | ||
| + | float3 Color = EstimateIrradiance( SurfaceNormal, ObjectSH ); // Evaluates the irradiance in the given direction | ||
| + | } | ||
| + | |||
| + | This was a neat and cheap trick to add some nice directional ambient on my objects. You could also estimate the SH in a given direction to perform some "glossy reflection" or even some translucency using a vector that goes through the surface. | ||
| + | And for a very low memory/disk storage as I stored only 9 RGBE packed coefficients (=36 bytes) + a 3D position in the map (=12 bytes) that required 48 bytes per "environment node". The light field was rebuilt when the level was loaded and that was it. | ||
| + | |||
| + | Unfortunately, the technique didn't allow to change the environment in real time so I oriented myself to a precomputed array of environment nodes : the network of environment nodes was rendered at different times of the day, and for different weather conditions (we had a whole skydome and weather system at the time). You then needed to interpolate the nodes from the different networks based on your current condition, and use that interpolated network for your objects in the map. | ||
| + | |||
| + | == Upgrade == | ||
Revision as of 23:24, 3 January 2011
Incentive
Using Nuaj and Cirrus to create test projects is alright, but came a time where I needed to start what I was put on this Earth to do : deferred HDR rendering. So naturally I started writing a deferred rendering pipeline which is quite advanced already. At some point, I needed a sky model so, naturally again, I turned to HDR rendering to visualize the result.
When you start talking HDR, you immediately imply tone mapping. I implemented a version of the "filmic curve" tone mapping discussed by John Hable from Naughty Dog (a more extensive and really interesting talk can be found here [1]) (warning, it's about 50Mb !).
But to properly test your tone mapping, you need a well balanced lighting for your test scene, that means no hyper dark patches in the middle of a hyper bright scene, as is usually the case when you implement directional lighting by the Sun and... no ambient !
Let's put some ambience
That's when I decided to re-use my old "ambient SH" trick I wrote a few years ago. The idea was to pre-compute some SH for the environment at different places in the game map, and to evaluate the irradiance for each object depending on its position in the network, as shown in the figure below.
The algorithm was something like :
For each object
{
 Find the 3 SH nodes the object stands in
 ObjectSH = Interpolate SH at object's position
 Render( Object, ObjectSH );
}
And the rendering was something like (in shader-like language) :
float3 ObjectSH[9]; // These are the ObjectSH from the previous CPU algorithm and change for every object
float3   PixelShader() : COLOR
{
 float3 SurfaceNormal = RetrieveSurfaceNormal(); // From normal maps and stuff...
 float3 Color = EstimateIrradiance( SurfaceNormal, ObjectSH ); // Evaluates the irradiance in the given direction
}
This was a neat and cheap trick to add some nice directional ambient on my objects. You could also estimate the SH in a given direction to perform some "glossy reflection" or even some translucency using a vector that goes through the surface. And for a very low memory/disk storage as I stored only 9 RGBE packed coefficients (=36 bytes) + a 3D position in the map (=12 bytes) that required 48 bytes per "environment node". The light field was rebuilt when the level was loaded and that was it.
Unfortunately, the technique didn't allow to change the environment in real time so I oriented myself to a precomputed array of environment nodes : the network of environment nodes was rendered at different times of the day, and for different weather conditions (we had a whole skydome and weather system at the time). You then needed to interpolate the nodes from the different networks based on your current condition, and use that interpolated network for your objects in the map.

